Our Knowledge Base contains the answers to more than 500 previously asked questions.
-
Bid Manager
- ☞Video: Bid Manager
- How do I generate a Bill or Sub-Contract from a Bid?
- How do we create a bid package from an Estimate?
- How do I send a request to bid to bidders?
- If a bidder needs to rebid, what do I need to do?
- How do I record bid numbers that were given to us offline?
- Do I have to create an estimate before creating a bid package?
- Does my sub have to create an account before they can submit their bid?
- How do I review the bids that have been received?
-
Bills
- Video: Bills
- Are Bills synced with QBO?
- Bills (Overview)
- Can a customer or vendor credit be added?
- How do I change a Bill from open to paid?
- What is the difference between a Expense and a Bill?
- Are Bills synced with QuickBooks?
- How can I see if any Bills are past their due dates?
- How do I review the payment history for a Bill?
- How do I change specific field names when I generate the Bill in PDF format?
- How do I generate a PDF of the Bill and email to employee?
- How do I import Expenses into a Bill?
- How do I generate a Bill from a Purchase Order or Subcontract?
- How do I markup a Bill and generate an Invoice directly to my Customer?
- How do I to post a payment to a Bill?
- How do I make sure a Bill is accurately job costed?
- Bills
- How do I pay full or partial retention on a Sub Contract?
- How do I generate a Bill from the Subcontracts Module?
- Show all articles ( 4 ) Collapse Articles
-
Calendar
- ☞Video: Calendar
- How to sync the Contractor Foreman Calendar with Outlook or Google?
- Which items can appear on the calendar?
- How do I see what Events are assigned to each Employee?
- How do I add an event in Calendar from the Dashboard?
- How can I add a Marketing activity to my Calendar?
- How do I create an Event on my Calendar?
- How can I display my Crew Schedule on the Monthly view of the Calendar?
- How do I receive a notification when a task has been completed?
- What is the difference between the Private and Shared setting in the Calendar.
-
Change Orders
- ☞Video: Change Orders
- Adding a New Change Order
- Basics of Change Orders
- How can I adjust a change order amount?
- Modifying a Change Order
- How do I generate a Change Order for a Subcontractor?
- How do I submit a Change Order for Approval?
- How do I verify the Change Order value is accounted for in the financials of the Project?
- How do I keep the Change Order amount from affecting the overall Contract Value of the Project?
- How do I add Markups to items in a Change Order?
- How do I add Tax to a Change Order?
- How do I cross reference to an RFI in Change Order Request?
- How do I change the status of a Change Order from Hold to Billed?
- Why do we have an option to import items from an Estimate into a Change Order?
- How do I make a Change Order reflect a negative value?
- How do I convert a Change Order Request to a Change Order?
- Is there an option to sign the Change Order within the mobile app?
- How do I adjust a Change Order amount?
- How do I generate an Invoice from Change Order?
- How do I edit Templates for Invoices?
- Show all articles ( 5 ) Collapse Articles
-
Client Portal
- Is the Gantt view available for my client?
- Can my client pay their invoice online?
- Can I control what my client sees and preview what they will see?
- How do I enable or disable Client Portal access?
- Can I add a client portal login form to my website?
- How does my client change their username or password?
- Can my clients create change order request from the portal?
- Can my clients designer or architect have access to the client portal?
- Does the client have to create an account or is it created for them?
- ☞Video: Client Portal
-
Cost Codes
- ☞Video: Cost Items vs Cost Codes
- Adding or Revising Cost Codes
- How can I import cost codes I have in Excel?
- Import Cost Codes
- Using Cost Codes
- How do I add Cost Codes to Contractor Foreman from my QuickBooks file?
- How do I delete a Cost Code I no longer use?
- What is the purpose of a Retainage Code and how does this integrate with QuickBooks?
- How do I add a Child Code?
- How do I avoid duplicate Cost Codes when I import a new CSV file?
- How can I restrict the cost codes that are displayed when using the Timecard feature?
- Deleting Cost Codes
-
Cost Items Database
- ☞Video: Cost Items Database
- ☞Video: Cost Items vs Cost Codes
- Basics of Cost Items Database
- How do I use the Hidden Markup in the Cost Items Database?
- What is the purpose of Variations in the Cost Items Database record?
- How do I add or change markups to multiple line items in the Cost Items Database?
- How do I create an Item Group and use it from the Cost Items Database?
- How do I import Cost Items into the Database using a CSV file?
- How do I see which items have Detailed Descriptions in my Cost Items Database?
- Basics of Schedule of Values (SOV)
-
Crew Schedule
- ☞Video: Crew Schedule
- How can I reduce the amount of projets that appear in the list?
- How do I notify my crew about their work schedule?
- How do I create or edit a crew?
- Can I schedule multiple people at one time?
- How do we change the company work hours and work days?
- Can I show my project schedule (Gantt items) on my Crew Schedule?
- How can I mark out someone who will be out of work?
- When should the New Shift button be used?
- How do I add a Crew for use with the Crew Schedule or Timecards?
-
Daily Logs
- ☞Video: Daily Logs
- Adding a New Daily Log
- Basics of Daily Logs
- How can I put photos in daily logs?
- How to add employees to a Daily Log?
- How to create daily log record from Time card?
- Please list the logs that we could use the daily logs for?
- How do I track the materials received at the site and reconcile the quantities with the appropriate Purchase Order?
- What is the benefit of cross referencing incident / accident logs to Daily Logs?
- How do I add a note to a Daily Log created on a previous date?
- How do I add an Incident in a Daily Log?
- How do I add Employees to a Daily Log if I am not using Timecards?
- How do I add Material Items and Equipment Items to Daily Logs?
- How do I attach Photos to a Daily Log?
- How do I prevent associated or attached files from showing on the Daily Log PDF?
- How do I see Time Card hours in the Daily Log?
- How do I remind Superintendents or Foremen to create a daily log after clocking out?
- How do I update the Daily Log status ?
- Show all articles ( 3 ) Collapse Articles
-
Directory & Contacts
- Video: Directory
- Basics of Directory
- Types of Directory Contacts
- Exporting Contacts from QuickBooks Online
- How do I add an employee?
- How do I Save my Excel File as a CSV?
- How do you delete a customer record?
- How to Convert a Lead to a Customer?
- Importing Contacts
- How do I check/uncheck items under employee privileges?
- How to make an employee a user?
- Adding Users (Licenses)
- Disabling an Employees or User's Account
- Users and Employees
- How are allowances set?
- How are Tags and Scope of Work fields used in Contractor Foreman?
- How do I modify Tags for use in the Directory?
- How do I add Additional Contacts to a Directory record?
- How do I create an Estimate from the Lead record?
- How do I delete a Customer record?
- How do I delete the User from directory?
- How do I import multiple contact records using the CSV file?
- How do I link a Contractor to a Bid Package?
- How do I create a Lead Capture Form?
- How is the Access/Gate Code from the Customer record used and can it be restricted to certain individuals?
- How do I assign or restrict Project access for Employees and Subcontractors??
- How do I setup a new User and send email with Login credentials?
- How do I make an Employee a User of the software?
- Directory
- Directory & Contacts
- Directory & Contacts
- An email I sent was not received or bounced.
- Show all articles ( 17 ) Collapse Articles
-
Document Writer
- ☞Video: Using the Document Writer
- What is the purpose of the Document Writer?
- Are there templates that I can use for Document Writer?
- How do I create or edit a document in the Document Writer?
- The formatting of my document is not correct
- Can I use the Document Writer as a means to get signatures, like a contract?
- How do I resend or download a generated/sent document?
- How do we create an Estimate proposal package?
- How do we create a lien waiver (or other agreement/contract)?
- ☞Video: Creating Proposals using Canva (and others)
-
Equipment Logs
-
Estimates
- Adding Estimate and Estimate Items
- Basics of Estimates
- How to add a tax percentage to bids so it can automatically give the total with tax?
- How to create an estimate template?
- How to Create an Estimate?
- How to use an Estimate Template?
- Is it possible to create an estimate without a Project tied to it?
- Is there a way you can add our address on the left-hand side of the estimates?
- What is the purpose of Optional Items and how to create one?
- How do I create an Estimate if I have not created the Project yet?
- How do I add information to a Bid Item to provide more details and clarification to the Bidder regarding that specific item?
- How do I add a tax percentage to bids so the Estimate automatically displays the total with tax?
- What is the purpose of the $0 item?
- How do I use the "variation" field within the Cost Items Database and Estimate?
- How do I add or modify the Project Type on the details page of the Estimate?
- How do I archive an Estimate?
- How do I assign the Vendor or Contractor to a specific line item in the Estimate? in the estimate in the line item?
- How do I award a bid received via the Bid Package?
- How do I copy a Section and its items to add a new Section?
- How do I create a new Bid Package for any trade and assign Bidders?
- How do I create a default Scope of Work for an Estimate?
- How do I create an Estimate Template and how do I use it to create New Estimates?
- How do I create an Estimate?
- How do I quickly delete all Estimate line items that have a $0 value?
- How do I easily display any Estimate line items that have a $0 value?
- How do I export the Estimate Items to a CSV file?
- How do I import a CSV file of items into an Estimate?
- How do I make changes to the Cover Sheet of the Estimate?
- How do I add or modify the default Estimate status values to represent our workflow?
- How to rearrange the sections and items in a section?
- How do I rearrange the sequence of Sections and Estimate line items using drag and drop?
- How do I search for a previous Estimate?
- How do I send a Bid Notification or Request to bid from the Estimate?
- How do I send a proposal so that the customer sees the final total amount and not the complete estimate breakdown?
- How do I share files attached to the Estimate with the Customer or Lead?
- How do I submit an Estimate for approval?
- How do I update an Estimate if its status is not set to Bidding?
- How do I courtesy copy other contacts when I submit the Estimate for approval via email?
- How do I track Bidding emails and quotes from the various Vendors or Subcontractors?
- What is the difference between Selections, Options, Allowances and Variations?
- Basics of Schedule of Values (SOV)
- Markup vs Margin: What is the Difference?
- ☞Video: Estimates
- Local Material and Labor Costs Database from 1build
- Show all articles ( 29 ) Collapse Articles
-
Expenses
- ☞Video: Expenses
- Adding a New Expense
- Basics of Expenses
- How I can create an expense account ?
- How do I allocate Expenses to multiple Cost Codes?
- What is the Bank/Credit Account used for?
- When to use Expense or Bills? How does this impact job costing?
- What is the difference between an Expense and a Bill? How does this impact Job Costing?
- How do I show the Expense total amount as a negative amount?
- Are Expenses synced with QuickBooks?
-
Files and Photos
- ☞Video: Files & Photos
- How do I create the default folders for a specific Project?
- How do I add files to folders in the Files & Photos feature?
- How do I export a single file or multiple files in the Files & Photos feature?
- How do I move files from one folder to another within Files & Photos?
- How do I delete a file in the Files & Photos feature?
- How do I search for a file within a specific Project?
- How do I share a file with a client or vendor?
- Basics of Files & Photos
- Files and Photos
- How do I add files to a Project?
- How to connect Contractor Foreman to CompanyCam.
- Attachments vs Associated Files: What is the difference?
-
Forms & Checklists
- ☞Video: Forms (Basic Builder)
- ☞Video: Forms & Checklists (Advanced Part 1)
- ☞Video: Forms & Checklists (Advanced Part 2)
- Adding a Form to "My Favorites" and "Company Forms"
- Creating a Custom Form
- Editing a Form
- Forms and Checklists Overview
- How do I can send a form to a new lead to get Project details?
- How do I create a form using the Basic form builder? Using the Advanced form builder?
- How do I delete a Form?
- How do I designate a Form to be a favorite?
- Basics of Forms & Checklists
-
Getting Started
- ☞Video: Getting Started
- Adding Users (Licenses)
- Assigned Projects & Default Project
- Disabling an Employees or User's Account
- Exporting Contacts from QuickBooks Online
- Having trouble finding an item entered previously?
- How do I post a payment
- How do I setup what should show on the App Menu?
- How to Un-Archive an Item?
- How to use the "Quick Start" Method for Contractor Foreman
- Modifying / Editing and Saving Records
- Users and Employees
- Zapier Integration
- Basics of Company Settings
- How to use the feature Access/Gate Code?
- What should be the first step while starting work with Contractor Foreman?
- How do I add Custom Fields to add certain Features?
- What is the purpose of Custom Fields?
- How do I add an Inspection record and associate it to Permits?
- How do I add my address and other details or letterhead on the top of the PDF?
- Why to add multiple inspections for single project?
- How do I see my most recent activities and notifications?
- What is a good process to get up and running in Contractor Foreman quickly?
- How do I track Permits for a Project?
- How do I increase the size of my Logo?
- How do I access the Tutorials available to understand the software?
- What is the quickest way to add a Calendar entry, Sales activity or To-Do?
- When should I book my first training session?
- How do I edit the Templates for estimate, invoices etc?
- How do I remove the Sample Data that is initially installed with the software?
- How do I replace the Contractor Foreman logo with my company logo?
- How do I request time off?
- How do I schedule a Private Training?
- How do I view Archived Items?
- When should I use Chat vs booking a Training session?
- Adding, Editing & Assigning Roles
- Assigned Projects & Default Project
- How do I add an employee?
- How do I remove the Contractor Foreman logo and add my own?
- Show all articles ( 24 ) Collapse Articles
-
Incidents
- ☞Video: Incidents
- Adding a Employee Write Up
- Adding a New Incident
- Basics of Employee Write-Up's
- Basics of Incidents
- How Create an Incident?
- How to Create a New Employee Write-Up?
- How do I link or reference the Incident data to an Employee Write-up record?
- What is the OSHA 300 log for an employee?
- How do I create a New Employee Write-Up?
- How do I create an Incident?
- How do I create an OSHA report for any employee for any event that occurred?
- How do I make a copy of all the Incidents and Employee Write-ups for my HR files?
-
Inspections
- ☞Video: Inspections
- Adding a New Inspection
- Basics of Inspections
- How to Create an Inspection?
- How do I cross reference a Permit to the Inspection record?
- How do I assign the Status Color for my Inspections?
- How do I copy an Inspection?
- How do I create an Inspection?
- Why to add inspection in Permit Details, what is the purpose to add it?
-
Integrations
-
Invoicing
- ☞Video: Invoices
- Adding a New Invoice
- Basics of Invoices
- Can you make an invoice without any project?
- How can I add Tax to my invoice?
- Can a customer or vendor credit be added?
- How do I reduce the retainage deduction after having reached a certain contractual milestone for Invoicing?
- What is the difference between using the % or the $ markup toggle feature?
- How do I create Progress Billing Invoices?
- What is the purpose of a T&M invoice?
- How do I add Tax to my Invoice?
- How do I create a G702/G703 AIA Invoice?
- How do I create a Time & Material Invoice?
- How do I generate an Invoice from a Service Ticket?
- How do I force my Markup to be a specific $ amount instead of a percentage calculation?
- How do I post a Payment to an Invoice?
- How do I track Retainage on an Invoice?
- How do I Un-Archive or reactivate an Invoice?
- How do I designate whether Progress Invoicing for a Project is based on % complete or unit quantity?
- Is it relevant to raise invoices that are free from any specific project?
- How do I generate an Invoice that is not associated with a Project?
- How do I delete tax rates, so I can recreate proper ones?
- How do I setup and add a VAT Reverse Charge (reverse tax)?
- ACH payments submitted through WePay are not processing
- How do I edit Templates for Invoices?
- How do I set up Retention in a New Project?
- How is Retention (Retainage) held and released?
- Show all articles ( 12 ) Collapse Articles
-
Leads
- ☞Video: Leads
- How do I add a new Lead Source?
- How do I track calls and meetings with a lead?
- Can I add a lead capture form to my website?
- How do I sync leads from my Angi Leads and HomeAdvisor account?
- Can I send Leads to my CRM or email system using Zapier?
- If a Lead becomes a customer, does the data transfer to the customer record?
- What is the difference between the Leads in the Directory and the Leads module?
- What is the difference between a Lead and an Opportunity
- How do I convert a Lead to a Customer?
-
Notes
-
Opportunities
- ☞Video: Opportunities
- How do I create an Estimate and link it to the Opportunity record?
- When does it make sense to use the Opportunity record?
- What is the difference between a Lead and an Opportunity?
- What happens to the associated estimates of the opportunity once it gets converted?
- Why would a customer want to convert an Opportunity to a Project?
- How do I notify or assign an Opportunity to an Employee for follow-up?
- How do I convert an opportunity into a Project?
- How to get all Opportunity line items to Estimate and SOV?
- How to set Opportunity each stage of a custom theme for general view list of records?
- Can I keep the opportunity details after creating an estimate?
-
Payments
- ☞Video: Payments
- Basics of Payments
- Adding a New Payment
- WePay Online Payments FAQ's and How To's
- Can a customer or vendor credit be added?
- How does the Payment information sync with QuickBooks?
- How do I add or post a Payment to an Invoice?
- When to add payment for project?
- Why have my WePay funds have not been deposited?
- ACH payments submitted through WePay are not processing
- Stripe Online Payment FAQ's and How To's
-
Permits
-
Projects
- ☞Video: Managing Projects
- ☞Video: Job Costing with Contractor Foreman
- Adding a Project
- Assigned Projects & Default Project
- Basics of Projects
- How can a Project be removed from the list view after being Completed?
- How do I add files to a Project?
- Basics of Schedule of Values (SOV)
- How to view the schedule status of a Project?
- How do I enable a Project to accept Time Cards?
- How to manage a project created with a Work Order?
- Can Client Access be enabled from directory rather than project?
- How are the Committed or Actual Labor costs generated on the Financial Tab for the Project?
- What is the difference between Committed Cost and Actual Cost?
- How do I enable the Client Portal? Can I restrict the access to financial details?
- How do I create Invoices for my Work Orders from the Schedule of Values tab?
- How do I create Invoices for my Change Orders from the Schedule of Values tab?
- Can I restrict the access to financial details?
- How do I change the Logo on the Client Portal?
- How do I build the set of default File Folders for saving my Project information?
- How do I change and track the Status of my Projects? Can I modify the default Project Statuses that are provided?
- How do I estimate my current Gross Profit from the Financial tab in the Project?
- Can the project status be changed automatically? (from pending to completed)
- How do I receive a notification that my Project has gone over Budget?
- How do I show Labor Costs in the Project Financial tab if Cost Codes are not being used in Timecards?
- How do I activate the geofence fence area for the Project? Is there a recommended radius for the GEO fence feature?
- How do I add companies and contacts to my Project Contact tab?
- How do I assign a Project Manager to a Project?
- How do I generate a Budget vs Actual report for a lump sum project?
- How do I know what files I have shared with my client?
- How do I limit or restrict Project Access to some Employees?
- How do I remove a Project from being displayed after being Completed but still keep all the details for historical reference?
- How do I restrict the Internal Notes entered on the Project screen from being seen by other Users?
- How do I select which Projects I want to show up on my Schedule?
- How do I send Login Credentials to my Client for use with the Client Portal?
- How do I set the Project IDs to be created automatically?
- How do I track costs against a Change Order in addition to the Original Contract or Estimate?
- Where can I track all the payments done by me for any particular project?
- How do I enable the Procurement tab for my Project?
- How do I modify the Project folder tree in the Project files tab?
- How to add a New Note & Link it to a Project?
- Assigned Projects & Default Project
- Attachments vs Associated Files: What is the difference?
- Understanding the Work In Progress (WIP) Report
- ☞Video: Schedule of Values
- How do I set up Retention in a New Project?
- Show all articles ( 31 ) Collapse Articles
-
Punchlists
- ☞Video: Punchlists
- Adding a New Punchlist
- Basics of Punchlists
- How do I print a Punchlist?
- How to add items to a Punchlist?
- Modifying or Editing a Punchlist Line Item
- How do I designate which items are completed on the Punch List?
- How do I add items to the Punch List after it has been created?
- How do I print a Punch List?
-
Purchase Orders
- ☞Video: Purchase Orders
- Basics of Purchase Orders
- How do you change the ship to address on the purchase orders?
- Why should I import my Estimate items into a Purchase Order?
- How is Reference & FOB point used in producing a Purchase Order?
- How do I add a Discount on a Purchase Order?
- How do I change the ship to address on the purchase orders?
- How do I change the terminology on the PDF that is created by using a Template?
- How do I generate a Bill from the Purchase Orders Module?
- How do I manually add items to a Purchase Order?
-
QuickBooks
- Add a Discount Line Item on Invoices
- Are Bills synced with QBO?
- Create a Retainage Account
- How do I calculate Payroll?
- Set Default Income/Expense Account
- What Syncs with QuickBooks
- How do I compare and match the entries I have in Contractor Foreman and QuickBooks?
- How do I know when an item has successfully synced and moved over to QuickBooks?
- How do I verify that the QB sync has been complete without any errors?
- How Do I Integrate with QuickBooks?
- Are Bills synced with QuickBooks?
- Are Expenses synced with QuickBooks?
- Migrate from QuickBooks Desktop to QuickBooks Online
- How do I disconnect from QuickBooks?
- How do I choose what syncs with QuickBooks?
-
Reports
- ☞Video: Reports
- ☞Video: Job Costing with Contractor Foreman
- Basics of Reports
- How is Labor Calculated
- Totaling Time in Time Reports
- How do I access Custom Fields through reports for any particular Feature?
- How do I generate a weekly time card report for an individual employee?
- How do I view a report without actually downloading it?
- How do I set the default format of report to PDF?
- How to generate any custom report?
- How do I generate a Custom Report?
- How do I generate a report to see the Estimated and Actual cost?
- How do I see an employee's total hours and activity for a specific project?
- How do I generate a Total Billings Report with $ amounts?
- Reports
- Job Costing Calculations Explained
- How do I export time cards into a decimal format?
- How do transactions impact job costing reports?
- Understanding the Work In Progress (WIP) Report
- What is the difference between committed costs and actual costs?
- Markup vs Margin: What is the Difference?
- Show all articles ( 6 ) Collapse Articles
-
RFI & Notices
- ☞Video: RFI & Notices
- Adding a Compliance Notice
- Adding New RFI (Request for Information)
- Basics of Correspondence
- Correspondence Overview
- New Schedule Notice
- What is the purpose of a Compliance Notice?
- What is the purpose of a Schedule Notice?
- What is the purpose of a Request for Information?
- Why do we cross reference a Change Order in the RFI record?
- Compliance Notice vs Schedule Notice
-
Safety Meetings
- ☞Video: Safety Meetings
- Basics of Safety Meetings
- How to Create a New Safety Meeting?
- How do I add new safety topic and content for my Safety Meetings?
- How do I attach a file/image to a Safety Meeting?
- How do I document the signatures of the attendees to a Safety Meeting?
- How do I restrict an attendee's access to a safety meeting to providing his Signature Only?
- How do I add a video link for any safety new topic?
-
Schedule
- ☞Video: Scheduling
- How to get my Projects to show on schedules?
- What is a Baseline schedule and how is it used?
- What is the purpose of Milestones?
- How do I add and modify the tasks in the Schedule?
- How do I make Schedule tasks visible to the Schedule tab within the Project?
- How do I link tasks across multiple projects so if a task is delayed in one project it will trigger a delay in another project?
- How do I document task completion on the Schedule?
- How do I create a Schedule from the line items in my Estimate?
- How do I select which Projects I want to see simultaneously in the Schedule feature?
- How do I create a Gantt chart for any project and track that project?
- What is the purpose of the Assigned Contractor and Employee field in the Schedule Task?
-
Schedule of Values
- ☞Video: Schedule of Values
- Basics of Schedule of Values (SOV)
- If I don't Import the line items from Estimate and I add them manually, how does this affect the calculations in the Financial tab of the Project?
- How do I add the Change Order costs and marked up values to the Schedule of Values?
- Is it required to add or import the Schedule of Value from the Approved Estimate?
- How do I generate an Invoice from the Schedule of Values?
-
Service Tickets
- ☞Video: Service Tickets
- Basics of Service Tickets
- Why can I not show all open service tickets on one screen?
- What is Dispatch: Map & Calendar used for?
- Does a Service Ticket have to be associated and linked to a Project?
- How are the Service Tickets linked to the Timecard feature?
- What is the purpose of Duration field in the Service Ticket?
- How do I archive Service Tickets?
- How do I invoice the Customer for Service Tickets?
- How do I post a payment for any service ticket?
- How do I see a list or display of all of my open Service tickets?
- How do I set the Priority Status for the Service Ticket and can I filter and display a list based on these Priorities?
- How do I update the Service Ticket status?
- How do I track the hours spent on a specific Service Ticket?
-
Settings
- ☞Video: Settings
- ☞Video: Cost Items vs Cost Codes
- Assigned Projects & Default Project
- Cleaning Text for Copy and Paste (Fixes Blank PDF)
- Location Permission Settings in Android
- Roles & Security Settings
- Settings and their Descriptions
- WePay Online Payments FAQ's and How To's
- How do I set a reminder for any Expiring Certificates or Licenses that I am tracking?
- How do I set the Sort Method for Contacts for a specific User account?
- Can I add new fields to any of the default Templates?
- How are Roles used and how are they connected to the Directory?
- What is the difference between the Billing rate and the Burden rate in Employee Timecard reporting?
- How do I delete my Company Logo from the top of specific Templates?
- How do I remove Contractor Foreman logo from the PDF's?
- How many users can be created via one Contractor Foreman subscription?
- What is the Running Time Card Notification used for?
- How User Number being counted?
- How do I add a Crew for use with the Crew Schedule or Timecards?
- How do I add and use Tags?
- How do I add and modify Custom entries for each of the pulldown features?
- How do I add or modify the Custom Fields for each Feature?
- How do I add or modify the PDF templates for each of the Features?
- How do I add Taxes and Tax Rates to my account?
- How do I add Time Off Requests under the User Settings?
- How do I add Training & Certifications under the User Setting?
- How do I assign a color to a User?
- How do I change my Password?
- How do I change Status labels and their colors in the card view of certain Features?
- How do I change the color theme for the Templates?
- How do I create a new User?
- How do I see all the assignments for the Users on the Calendar?
- How do I set or edit my email signature?
- How can I import cost codes from Excel into Contractor Foreman?
- How do I add or modify Roles?
- How do remove a Custom Field from being used within a Feature?
- How do I remove Sample Data?
- How do I replace my Company Logo with a new one?
- How do I restrict the ability to DELETE records to certain individuals within my company?
- How do I send a User his credentials and login information?
- How do I set the initial Numbering for each of the Features?
- How do I setup what features should be displayed and in what order on the App Menu for my mobile device?
- How do I delay or stop notifications from going to a device?
- How do I sync my personal Calendar with Contractor Foreman?
- Account Details & Upgrade or Cancel
- Adding, Editing & Assigning Roles
- Assigned Projects & Default Project
- Roles & Security Settings
- Basic of User Settings
- What is the maximum file size for each upload?
- How do I remove the Contractor Foreman logo and add my own?
- How do I add my address and other details or letterhead on the top of the PDF?
- Stripe Online Payment FAQ's and How To's
- Show all articles ( 38 ) Collapse Articles
-
Sub-Contracts
- ☞Video: Sub-Contracts
- Basics of Sub-Contracts
- What are the benefits of Sub-Contracts?
- How do I enter a Bill from a Subcontractor for partial completion of their Scope of Work?
- How do I designate that Retainage is supposed to be held on a Sub-Contract?
- What are the benefits of using a Sub-Contract instead of a Purchase Order?
- How does a Subcontractor approve a proposed Sub-Contract? Do they need to be a User of the software?
- What is the purpose of "Share Link" in the Action dropdown?
- How do I track work performed for a 1099 Subcontractor?
- How do I generate a Bill from the Subcontracts Module?
- How do I pay full or partial retention on a Sub Contract?
-
Submittals
-
Time Cards
- Basics of Time Cards
- How can I activate GPS location for time cards?
- How do I calculate Payroll?
- How is Labor Calculated
- How to bypass the time clock feature and just enter total hours?
- Timecards
- Totaling Time in Time Reports
- What is 'Running Time Card' Notification?
- I have entered the weekly sheet for my employees accidentally. Can I delete it? If not how to adjust that cost in my contract amount?
- If I clock into an Employee Time Card, why is the Crew Card automatically disabled?
- How is overtime is calculated?
- How do I use Tags in Timecards?
- How do I set up a notification if I exceed budgeted hours on a Project?
- How do I enable the Timecard feature for a Project?
- How do I activate GPS tracking for Timecards?
- How do I add a Break manually to a Timecard?
- How do I extend a time card after clocking out?
- How do I set up automatic breaks to be applied in time cards?
- How do I set up multiple time card administrators?
- How do I set who will be notified when I Request Time Off?
- How do I track my Labor Costs against my Estimated Labor Costs?
- How does the Verify Time Card feature work?
- I want to input my employees time at the end of each day. Is there a way to bypass the time clock feature and just enter 8-hour days for my crews?
- My labor amounts are wrong based on hours worked.
- How do I export time cards into a decimal format?
- ☞Video: Time Cards
- How do I activate the geofence fence area for the Project? Is there a recommended radius for the GEO fence feature?
- Prevailing Wage, how to use different Labor Rates for different Projects?
- Show all articles ( 13 ) Collapse Articles
-
To-Do's
- ☞Video: To Do's
- Adding To-Do's
- Basics of To-Do's
- How can I make the To Do's so only I can see them?
- How do I make the To Do's show up on my Dashboard?
- How to check off To Do list items?
- If a To-Do is marked private, who can access the To-Do?
- How do I assign a To-Do and notify them automatically?
- How does the person assigned to a To-Do gets notified?
- How do I create a To-Do if I am at my Dashboard?
- How do I make a To-Do private?
- How do I set the status of a To-Do from open to completed?
- How do I see all To Do's on the Calendar?
- How do I check off To Do list items?
- How do I use a To-Do template to create a new To-Do? Can I use multiple To-Do templates to create a single To-Do?
-
Vehicle Logs
-
Work Orders
- ☞Video: Work Orders
- Basics of Work Orders
- How can I upload files to a work order?
- How do I archive a work order?
- How do I add or modify line items and quantities to a Work Order if it has already been Approved?
- How do I link a Work Order to a Project?
- How can I use a Work Order as a project
- How do I import Work Order items into a Change Order Request or Change Order?
- What is the purpose of the Type and Drawing fields in the Work Order?
- How do I enter Terms & Conditions for a Work Order and why is this beneficial?
- How do I generate an Invoice from a Work Order?
- How do I import specific estimate items into a Work Order?
- How do I upload files to a Work Order?
Basics of Invoices
Purpose:
Background:
Contractor Foreman allows you to create and send invoices directly from the app. You can generate one-off invoices, import from your Schedule of Values, or create AIA style G-702 and G-703 application for payment invoices.
**Create SOV (Schedule of Values)
**Create an AIA style G-702 and G-703 Invoice
Points to Remember:
Required fields are marked with an Asterisk (*)
Invoices will also show up on your Dashboard (Home Screen)
To save your work, click the blue Save button.
To edit the record, click the green pencil icon in the upper right corner.
Deleting Items can only be done by a person with Admin Rights or if you are given access to do so.
If an Invoice needs to be Deleted, you can do so by clicking on the Action button at the bottom of the page on the right.
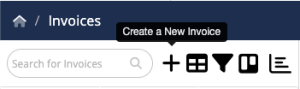
Steps to Create a New Invoice:
- Navigate to Main Menu.
- Click on Invoices.
- Click on Plus button on the top left.
- Enter the following information:
Details Tab:
- Project:
- Customer: (Mandatory)
- Authorized: Select Contact from drop-down.
- Invoice Date / Status: (Mandatory)
- Inv # / App #:
- Billed To / Retainage:
- Add Items to Invoice: Select options from drop-down.
- Terms / Due Date: Select from Drop-down.
- Period Start/End:
- Description:
- Tax / Amount: Select from Drop-down.
- Invoice Notes:
Terms Tab:
- Invoice (Terms and Conditions): Select option “ Default “ Custom “ Both.
- Default: Full-payment is due within 30 days of receiving this invoice unless other terms have been agreed upon.
Payments:
- Payment History: Gives you a preview of your payment history.
**How to Post a Payment?
Files:
- Add an Attachment: This is a great feature to add in there all the backup needed for the invoice: from photos of the completed work, up to expenses, bills, etc. for a Time & Material Invoice. Upload all Photos & Files in link to this Project. (On the phone or Tab this would be an “Add Attachments” button so just click away, then click on Upload Photos, Browse or App Gallery & it will upload here automatically)